"we strive for water conservation"

 Home >> Products >> Maintenance Process
The Maintenance Process of Waterfree Urinal
- Our waterfree system provides our users with:
- This presentation will guide you through the necessary steps to properly maintain Falcon Waterfree urinals
>> Touch free operation
>> Reduced operating expenses
>> Hygienically cleaner than watered urinals
>> Ability to conserve a precious resource – water!
How the system works
- Vitreous China (Porcelain) urinals
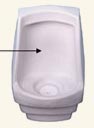
- The cartridge acts as a funnel
- Urine flows down into the cartridge through blue sealant liquid
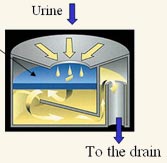
- Sediments collect inside the cartridge
- Remaining urine is allowed to pass freely down the drain
- Customers should expect 15,000 uses per cartridge
Maintenance is Essential!
- The system operates flawlessly when two things are done correctly
>> Proper installation
>> Proper ongoing maintenance
- Proper Cleaning is Essential
Changing Cartridges & Basic Cleaning:
Step 1:
Do you have everything needed?
The box should have:
- Cartridge (1)
- Plastic key (1)
- Sealant (1)
- Disposal bag (1)
- Plastic glove (1)
- Instructions (1)
Step 2:
Anticipating Change-out
- Expect 15,000 uses per cartridge
- Estimate the time from install to change:
Observing Spent Cartridge
- Flow of fluids has nearly stopped
- Run small amount of water down cartridge to observe flow rate
- Flow of fluids has stopped
- Trace amounts of blue sealant are visible on the cartridge
Step 3:
Removing the cartridge & disposal
Tip: Use mist of aerosol spray to dissipate odors from open trap
- Using the plastic glove, insert plastic key into cartridge
- Turn counterclockwise, from 12 o\92clock to the 11 o\92clock position
- Once free, lift upward carefully allowing fluids to drain momentarily
- Place cartridge into disposal bag
- Tightly secure top of bag
- Disposal options:
>> Recycle
>> Ordinary trash
Step 4:
Flushing the drain line
- To ensure a clear, clean drain line always carefully flush the open line with 1-2 buckets of warm soapy water \96 ensuring the bottom of the housing and line are clean & there\92s good flow
- This takes just a moment and ensures open drain lines
- Snaking of lines should occur only when lines cannot be opened with simple flushing
>> Care must be taken when snaking to avoid damage to the urinal and/or housing
Step 5:
Install new cartridge
Prep:
- Wipe clean the housing rim area
- This helps prevent sticking of cartridges
Installation:
- Using the key provided, lower the cartridge into the housing at the 11 o\92clock position
- Turn clockwise to the 12 o\92clock position \96 locking cartridge into the housing
Step 6:
Priming the cartridge
Step One:
- Fill the cartridge with approximately 32 oz of water or until there no air bubbles escaping from the cartridge.
- It\92s essential to always add water before proceeding to adding sealant!
Step Two:
- Add blue sealant to cartridge
- Allow sealant to drain into the cartridge until only trace amounts remain
Step 7:
Quick clean-up
Clean-up is a snap!
- Using a sponge or soft rag, wipe away traces of blue sealant remaining on the cartridge
- Spray (mist) cleaner onto bowl surface
- Never dump large amounts of any cleaning solution directly into the bowl
- Wipe with sponge, soft rag or Johnny mop.
- That\92s it!
Maintenance reminders
Critical steps
- Cartridge removal:
- Always carefully flush the open line with 1-2 buckets of warm soapy water, ensuring the bottom of the housing and line are clean
- Care must be taken when snaking to avoid damage to the urinal and/or housing
- Wipe clean the housing rim area. This helps prevent sticking of cartridges
- Installation of cartridge:
- It's essential to always add water before proceeding to adding sealant!
- Spray (mist) cleaner onto bowl surface
- Never dump large amounts of any cleaning solution directly into the bowl
- Never dump mop buckets into a urinal with a primed cartridge
>> Turn counterclockwise, from 12 o'clock to the 11 o'clock position
>> Once free, lift upward carefully allowing fluids to drain momentarily
>> Using the key provided, lower the cartridge into the housing at the 11 o'clock position
>> Turn clockwise to the 12 o'clock position - locking cartridge into the housing
Shortened Cartridge Life?
Troubleshooting
Flushing of cartridge
- Cause:
Dumping mop buckets into bowl flushes away sealant - Solution:
Janitorial staff training
Breakdown of sealant
- Causes:
Cleaners or other chemicals being dumped into the bowl - Solutions:
Get list of cleaner(s) used by janitorial crew Investigate other chemicals Coordinate with FWT Customer
Experience Dept
Plugged with foreign materials
- Causes:
Entrance of dirt from mop buckets Presence of items forced into cartridge - Solutions:
Work with janitorial staff Consider use of diverters
Cartridge is used up
- Cause:
Customer has received 15,000 uses but is unaware, feeling that the unit failed prematurely - Solution:
Work with customer to understand the usage - estimate usage patterns
Our Products
- Waterfree Urinal
- Flax ST 2255
- Salient features
- How Does it work?
- Why is it better?
- Benefits of Waterfree Urinal
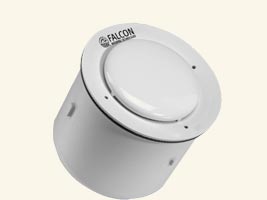
- Cartridge
- Maintenance Process
- Water Saving Toilets
- Floor Mounting Toilet
- Wall Mounting Toilet
- Unique Features
- How Does it work?
- Highlight
- What it saves
- Other Water Saving Products
- Water Saving Shower
- Bio-Tabs
- Bio-Plus
Other links:
2011 \A9 All Right Reserved West Coast Enterprises Pvt. Ltd.